Tulipano: October 22, 2012

Overwintering herbs


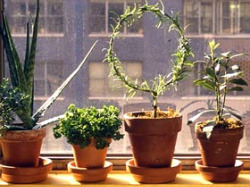
Choose a sunny, south-facing window to overwinter your herbs so they get the most light in winter.
There's nothing like the taste of fresh herbs in cooking. However, in most parts of the country, fall means the herb harvest is coming to an end. If you live in a mild winter area, you can enjoy harvesting perennial herbs that naturally overwinter outdoors, such as rosemary, lavender, oregano, and thyme, as you need them all winter long. However, in most parts of the country, perennial and biennial herbs either lose their leaves in winter or just aren't hardy enough to survive at all.
You certainly can dry and freeze herb leaves for winter use, but if you crave the taste of fresh herbs in winter, bring some of these perennial herb plants indoors. Whether they were growing outdoors in the garden or in pots, you can extend the fresh herb picking season by months by bringing the plants in when frost threatens. This technique works best for perennial and biennial herbs, such as chives, mint, oregano, thyme, parsley, and rosemary. Annual herbs, such as basil, tend to tire after a few weeks indoors. Annual herbs are best started from seed indoors under grow lights and grown as new plants for a winter harvest.
Here are the steps to bringing your perennial herb garden indoors.
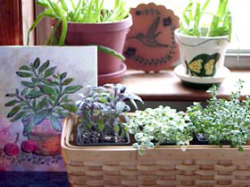
Who says overwintering herbs can't be displayed in an attractive fashion?
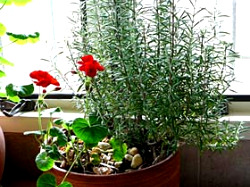
Rosemary can be overwintered indoors if given plenty of humidity and light.
  1. Select the healthiest herb plants in the garden. Don't necessarily select the largest plants. The digging and transplanting process will destroy many roots. Small to medium-sized plants will survive better.
  2. Check plants for any signs of insect activity and spray accordingly with an organic product, such as insecticidal soap, before moving them indoors.
  3. Water plants well and dig up herb plants in the garden on a cool, cloudy day. Place them in an appropriately-sized pot.
  4. Place these newly transplanted herb plants in a shady spot to adjust to the transplanting for 1 to 2 weeks. Keep them protected from winds and cold temperatures.
  5. Move container herbs that have been growing in full sun outdoors all summer into the shade at the same time. The lower indoor light conditions will be a shock to most plants, so acclimate them to the indoor environment by growing them in the shade outdoors for a few weeks.
  6. Before a frost, bring all the herb plants indoors and place them in a sunny, south-facing window.
  7. Check for any insects that have hitched a ride indoors on your plants.
  8. Water sparingly and don't fertilize.
  9. Most herbs will grow slowly, or not at all, indoors in winter. Harvest what you need, but leave some leaves for the plant to survive. You'll see your plants rebound come late winter when the stronger light levels and longer days return. The exception is parsley. This biennial herb will survive the winter only to send up a flower stalk in spring and then die. Pick all the parsley you want and compost the plant when you're done.
  10. Rosemary has special needs to survive. It likes cool temperatures (50- to 60-degree F), high humidity, and barely moist soil in winter. Keep the humidity high by misting often, and place the pot on a pebble tray filled with water. Water the pot just enough to keep the soil from drying out.
  11. Come spring, once all danger of frost has passed, move your perennial herb plants back outside. Repot them into pots with fresh potting soil, or transplant them into the garden. They will bounce back and start putting on new growth in no time.

Labels: , , , , , , , ,

Tulipano: August 21, 2012

Fun interesting tips for homeowners

1. To remove the salt deposits that form on clay pots, combine equal parts white vinegar, rubbing alcohol and water in a spray bottle. Apply the mixture to the pot and scrub with a plastic brush. Let the pot dry before you plant anything in it.

2. To prevent accumulating dirt under your fingernails while you work in the garden, draw your fingernails across a bar of soap and you'll effectively seal the undersides of your nails so dirt can't collect beneath them. Then, after you've finished in the garden, use a nailbrush to remove the soap and your nails will be clean.

3. To prevent the line on your string trimmer from jamming or breaking, treat with a spray vegetable oil before installing it in the trimmer.

4. Turn a long-handled tool into a measuring stick! Lay a long-handled garden tool on the ground, and next to it place a tape measure. Using a permanent marker, write inch and foot marks on the handle. When you need to space plants a certain distance apart (from just an inch to several feet) you'll already have a measuring device in your hand.

5. To have garden twine handy when you need it, just stick a ball of twine in a small clay pot, pull the end of the twine through the drainage hole, and set the pot upside down in the garden. Do that, and you'll never go looking for twine again.

6. Little clay pots make great cloches for protecting young plants from sudden, overnight frosts and freezes.

7. To turn a clay pot into a hose guide, just stab a roughly one-foot length of steel reinforcing bar into the ground at the corner of a bed and slip two clay pots over it: one facing down, the other facing up. The guides will prevent damage to your plants as you drag the hose along the bed.

8. To create perfectly natural markers, write the names of plants (using a permanent marker) on the flat faces of stones of various sizes and place them at or near the base of your plants.

9. Got aphids? You can control them with a strong blast of water from the hose or with insecticidal soap. But here's another suggestion, one that's a lot more fun; get some tape! Wrap a wide strip of tape around your hand, sticky side out, and pat the leaves of plants infested with aphids. Concentrate on the undersides of leaves, because that's where the little buggers like to hide.

10. The next time you boil or steam vegetables, don't pour the water down the drain, use it to water potted patio plants, and you'll be amazed at how the plants respond to the "vegetable soup."
 11. Use leftover tea and coffee grounds to acidify the soil of acid-loving plants such as azaleas, rhododendrons, camellias, gardenias and even blueberries. A light sprinkling of about one-quarter of an inch applied once a month will keep the pH of the soil on the acidic side.
12. Use chamomile tea to control damping-off fungus, which often attacks young seedlings quite suddenly. Just add a touch of tea to the soil around the base of seedlings once a week or use it as a foliar spray.
13. If you need an instant table for cocktails, look no farther than your collection of clay pots and saucers. Just flip a good-sized pot over, and top it off with a large saucer.
 14. The quickest way in the world to dry herbs: just lay a sheet of newspaper on the seat of your car, arrange the herbs in a single layer, then roll up the windows and close the doors. Crazy sounding, but it works!

Labels: , , , , , , , ,

Tulipano: July 25, 2012

When you forget to water your Hanging Basket

Oh, it’s happened to all of us. You come home from work to find your hanging baskets sadly wilting, seemlingly haning on for dear life. It’s easily done when containers are full to bursting point with lush summer annuals and you weren’t there to water them just when they needed it.

A quick drink is often all it takes to restore plants, but if the compost is very dry, water tends to "run off," so give small amounts and let each dose soak in before repeating the process. It also helps to spray wilting plants over with water, as a quick reviver. They’ll usually be back to normal the following morning.

But more drastic treatment is called for when a hanging basket has dried out so badly that the soil shrinks away from the sides of the container and the plants are almost on their last legs. The best remedy in cases like this is to lift the basket down, move it into the shade, and stand it in a bowl of water for five or six hours – overnight if it’s easier – while the compost re-hydrates thoroughly. But those plants will inevitably have suffered some damage.

When soil turns bone-dry it shrinks, stripping away a lot of tiny root hairs; since those are the ones that take up water, affected plants need intensive care while they recover. The trick is to reduce the leafy area of the plant by about a third, so it doesn’t lose as much moisture from transpiration as usual – simply prune any stems that are clearly past saving plus any that will tidy up the shape of the plant.

That done, treat your plant to a few days of light regular watering – still in the shade – while they replace lost roots, then give them a foliar feed. (Use liquid seaweed extract or one of the foliar feeds from a garden center; since the nutrients are taken in through the leaves, the plant still benefits even if the roots are a tad frail).

After two or three weeks an affected basket will look nearly as good as new. But you’ll need to take special care over deadheading from then on to prevent plants running to seed prematurely – it’s their natural reaction to a sudden drought, since they are trying to reproduce themselves before they die.

Labels: , , , , , ,

Tulipano: April 24, 2012

When to plant, really.

You know every spring I hear myself telling my customers, "I've never seen so much rain!" or "they are predicting snow" or pick a springtime woe for your landscape and we've had it.

This year I can honestly say that we have never experienced a spring like this one.  Some major stand out moments:

- I have tulips in raised beds that did not bloom because the temperature of the soil did not fall below the recommended 62 degrees F for a long period of time.

- We began mowing grass, because it needed it, 4-5 weeks early.

- I have seen grub activity (or animals feeding on grubs) as early as the first week in April.

- Our wholesale nursery started releasing material as ready to plant in March, which is 3 weeks early.

Because this winter and spring has been so unpredictable, I offer a cautionary word to those who are thinking about planting annuals, herbs and vegetables sooner than later.  Normally our last day of frost does not go past May 15th.  I would stick to that date.  With conditions precarious at best, it seems best to wait.

If you are excited and anxious what you can do instead is try starting seeds inside.  It can be done in something as inexpensive as an egg carton!  You can start some vegetables as well as some annuals, and this activity is great for teaching children about biology on a small accessible level.  Just remember to wait until after May 15th to bring them outside.

My favorites to start from seed:

Vegetables
Zucchini
Squash
Cucumbers
All herbs

Annual flowers
Zinnia
Alyssum
Cosmos
Marigolds

Check out this great article on growing annuals from seeds:
http://www.gardeners.com/Growing-Annual-Flowers-from-Seed/5663,default,pg.html 

Labels: , , , , , , , ,

Tulipano: September 13, 2011

CHANGE OF SEASON

Yesterday I went out to the vegetable garden to see what was prime for picking and ready to become our dinner.  To my surprise, there was very little.  A few gems hung desperately to dead and declining stems, but mostly...it was barren.  It made me sad.

Then as I was leaving this morning I noticed my impatiens, which I swear were full of life and promise only yesterday, were beginning to yellow and wilt. 

Now I was depressed. 

Thank goodness I was going shopping.  No not for the normal retail therapy of shoes and handbags (although I thought about it).  I was heading to The Branch in Highland Park to shop for a few special items to add to my customer's fall arrangements which we will be installing tomorrow. 

As I  perused the offerings of ornamental peppers, swiss chard and of course mums, I felt a bubbling of excitement.  Doing container plantings is one of the most fun and rewarding parts of my job.  And this year I'm trying something a little different.

Instead of being a slave to kale, cabbage and mums, I've decided to incorporate more perennials into my arrangements.  There are several species that lend themselves to a fall palette...Here are some of my favorites:

Grasses
Carex 'Silver Scepter': a great variegated grass which comes on late in spring so it stays nice through fall.
Carex 'Prairie Fire': really nice yellow burgundy hues on fine leaves.
Perennials
Sedum 'Mr. Goodbud': a new one in our nursery.  the color is to die for as is the height.  this is NOT autumn joy sedum, thank goodness.
Heuchera 'Plum Pudding': a favorite in the garden as well.  this purple coral bell has a real punch of color.
Heuchera 'Caramel': this coral bell is difficult to cultivate in beds because it doesn't overwinter well, but it was made for fall containers with its rainbow of caramel colors.
Ferns
Athyrium 'Lady in Red': i love this fern with its blood red stem, there is nothing else like it.
Groundcover
Ajuga 'Black Scallop': this groundcover is covered with gorgeous blue flowers in spring, but it holds onto its slick burgundy leaves through fall.

Add to the above ornamental peppers, little mums in 4.5" pots and ivy and you have the makings of a unique fall arrangement that can hold up to cabbage and kale any day!

My inspiration:

Labels: ,

Tulipano: August 4, 2011

COOKING FROM MY GARDEN

One of our jalapeno peppers
Although plants are my passion and my profession...I'm also an avid follower of all things food.  My DVR Que is loaded with programs like No Reservations, Check Please, Avec Eric and so on.  I also drive my family nuts because food is all I can talk about...I'm constantly asking them what they want for dinner right after we finish breakfast.  I know, it's annoying.

But being a planner I want to make certain I have everything on hand to prepare a delish home cooked meal efficiently without having to run to the store because I overlooked an ingredient.  What has really been nice as of late is the abundant crop of vegetables sprouting up in our garden. 

It provides us with inexpensive healthy organic options that taste ten times better than you can get at any store, or any farmers market for that matter.  It also allows me the opportunity to flex my creative skills.  My meal plan is more reliant on what I see when I walk out into the garden at night and less on a shopping list.

It is amazing what you can come up with if you say to yourself, "I'm limiting myself to what is in the garden and what is in my pantry and that's it."  I've wowed my family with tomato, basil and mozzarella pizza on the grill (thanks to my husband for the grilling part), zucchini, red pepper and spinach frittata and a surprise hit...cucumber, quinoa and wild rice salad.

Tonight I'm going to experiment with my favorite medium for vegetables, risotto.  I make a mean risotto (anyone can, it is mind-numbingly simple), but tonight I'm going to try zucchini, feta with a hint of basil.  We'll see.

What makes this all possible is that we have surrendered our largest perennial bed to a raised bed vegetable garden.  It is the single most exciting fulfilling thing we have done in our yard.  When it is too hot to piddle around in the flower beds, you can harvest the actual fruits of your labor. 

It is fairly simple to get started...you just need an area with good soil and lots of sun.  Here are a list of plants you can incorporate into your existing beds if you want to put your toe in the vegetable gardening water.

DONNA's RECOMMENDATIONS
Tomatoes - one grape variety and one slicing variety
Peppers - one Jalapeno, one green bell and one red bell
Zucchini - you need some space, but you get not only the zucchini but the blossoms which are great battered and fried
Cucumber - all you need is a trellis and harvesting is a breeze
Bush Beans - we plant four plants and it yields enough all summer for my family

Labels: , , , , , , , ,

Tulipano: April 13, 2011

My garden Spring 2011


My Garden


Since returning to customer service at ILT Vignocchi a year ago, I have been short on time to "piddle around" (technical term) in my yard. On the other hand, I'm getting loads of ideas for my yard from working with my customers!! Right now I'm focused on annual flower selection.


For those of you who order flowers from a wholesale grower know...pansies, impatiens and geraniums are the tip of the iceberg in terms of selection. Additionally, those annual flowers have almost become dirty words to customers who are constantly looking for something more unique.


After having designed my customers annuals for 2011 I am now left with trying to select varieties for my home containers, which is proving to be quite the challenge. I've stumbled across too many varieties that have become fast favorites. Although I have more containers than I should, I have only so much room. Plus I don't want it to look like the flower fairy threw up in them. I'm a fan of less is more.


So of the more, these are some of my favorites that will make an appearance at my house:


Cordyline Exotica: I'm not a tropical girl...that sounded funny. What I mean is they aren't my favorite. But this one is mezmorizing with streaks of white an shades of pink celebrating its thick leaves. Perfect for a spot that's as hot as an oven.


Echeveria Peacockii: A blue / grey succulent that although barely grows in a season, add amazing texture and a little whimsy.


Pink Dragonwing Begonia: I know it's not new, but it's spectacular and I cannot live without its constant color on arching branches that thrives in any exposure!!


Gomphrena Fireworks or Gnome Purple: Cool little purple balls that float above neat foliage. People will ask you, what is that.


Euphorbia: Why go with typical potato vine when you can have this pillow like plant dusted with tiny white flowers draping down your container.


I could go on and on and probably on a little further, but those are my picks for now.


A tip for you when once you select and plant your flowers. Don't forget to water!!! No flower will do well and reach its potential without a little drink, at least every other day. And remember, the hotter and windier it gets. The more they will require.

Labels: , ,